If you’re thinking about selling or gifting your old iPhone, first you should erase all content and settings on your device. In this guide, you will learn how to wipe your iPhone and find some useful tips on what to do beforehand.
Tips before selling iPhone
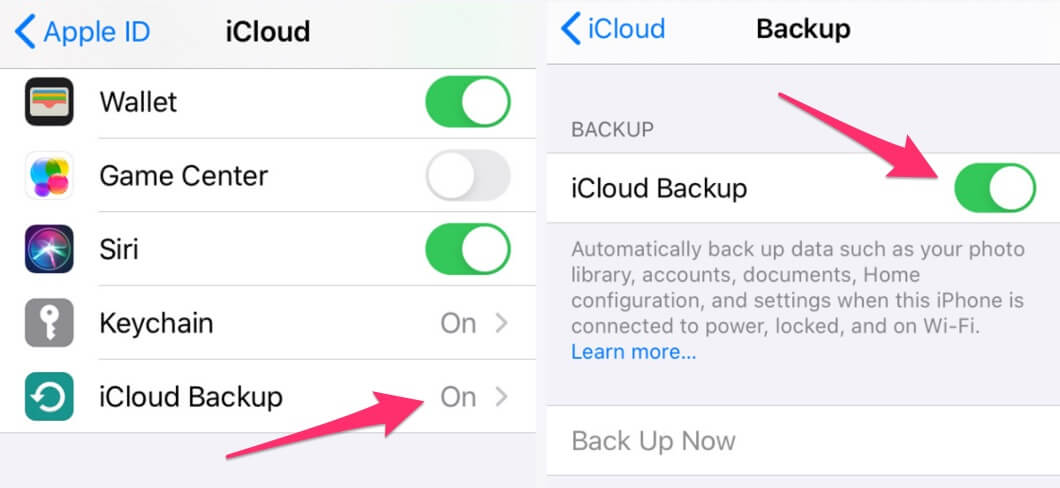
1. Back up iPhone
Before you do anything else, make sure you have an up-to-date backup of your iPhone. You can back up your iPhone using iCloud or your Mac or Windows PC.
- Back up an iPhone using iCloud. Connect your iPhone to Wi-Fi and make sure to plug in your iPhone if you run low on charge. Next go to Settings > tap on the Apple ID banner > tap iCloud > select iCloud Backup > toggle the switch to turn it on > tap Back Up Now. You’ll see the date and time of your last backup once it’s completed.
- Back up an iPhone using a Mac or Windows PC. If you’re out of iCloud storage, you’ll have to back up your iPhone using a Mac or Windows computer.
- For Mac with macOS Catalina, connect your iPhone and open Finder. With earlier versions of macOS, use iTunes to back up your iPhone. Click on General at the top of the Finder window. Then, select “Back up all of the data on your iPhone to this Mac.”
- On Windows PC, click the iPhone button near the top left of the iTunes window. Click Summary, then click Back Up Now.
2. Unpair Apple Watch
If you have an Apple Watch paired with your old iPhone, you’ll need to unpair it first before doing anything.
- Go to the “Apple Watch” app on your iPhone
- Tap on the “My Watch” tab
- Tap on the “i” button next to the watch you want to unpair
- Select “Unpair Apple Watch”
- Enter your Apple ID to disable Activation Lock
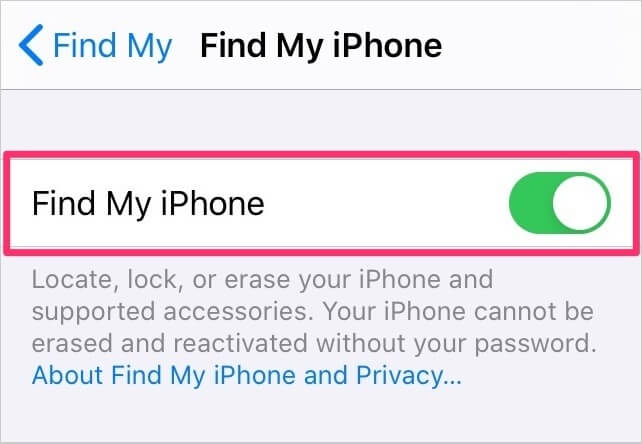
3. Turn off Find My iPhone
The next thing you will need to do is to disable Find My iPhone. If you sell your iPhone without turning the feature off, the new owner will not be able to use the phone. Unless if that person knows your Apple ID and password.
Anyone who buys a used iPhone from someone else other than Apple or an authorized Apple reseller needs to make sure “Find My iPhone” is turned off. This is a feature that is linked to Activation Lock, which allows you to remotely erase, locate your iPhone.
To turn off “Find My iPhone”
- Go to “Settings”
- At the top tap on your name
- Select “Find My”
- Tap on “Find My iPhone”, then tap the switch next to it to turn off this option.
A prompt will appear on the screen asking to enter your Apple ID Password. Enter your password and tap on “Turn Off”.
4. Sign out of iCloud, iTunes and the App Store
You’ll need to sign out of iCloud, iTunes, and the App Store. This will prevent you from losing any synced data (like your contacts, calendars, documents, photos, and any other information on the iCloud servers) once you start erasing everything from your iPhone.
For iOS 10.3 or later, go to Settings > Apple ID banner > scroll down and tap Sign Out. Enter your Apple ID and tap Turn Off to confirm your action.
For iOS 10.2 and earlier, go to Settings > iCloud > Sign Out. Tap Sign Out again to confirm your action > tap Delete from My iPhone > enter your Apple ID password. Finally, go to Settings > iTunes & App Store > Apple ID > Sign Out.
How to erase an iPhone
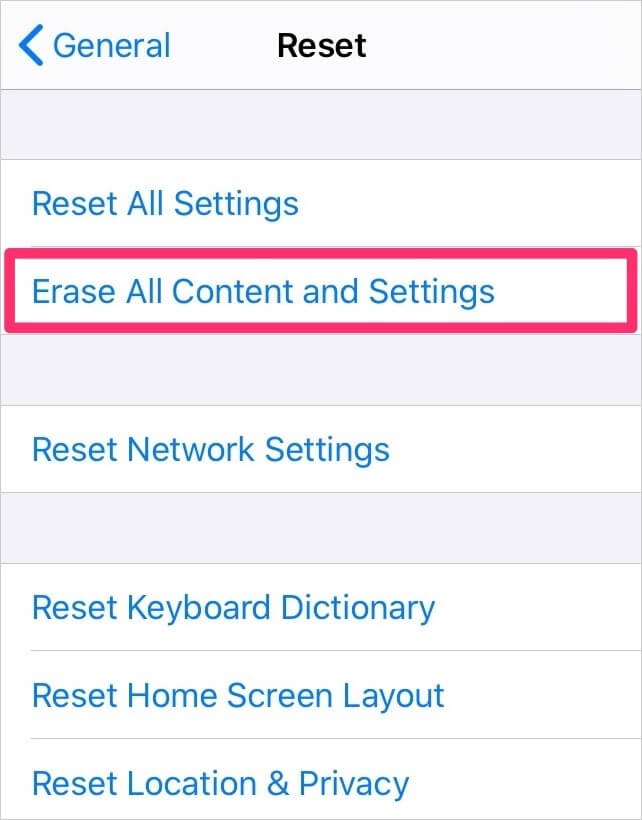
At this point, you can safely start to erase everything from your iPhone.
- Go to the “Settings” App
- Tap on “General”
- Scroll all the way to the bottom and select “Reset”
- Tap on “Erase All Content and Settings”
Once again, you’ll be asked to enter your Apple ID Password. Tap Erase to confirm the action. Your iPhone will be totally erased after a few minutes.
If you found value in this article, please share and/or recommend it, so your friends can enjoy it too.