
You find yourself in a photogenic situation, but after taking the picture, you discover that your iPhone camera is blurry.
The first thing that comes to mind is to clean the lenses, but what if it doesn’t address the problem? That’s what this guide is all about.
You’ll learn about the possible causes of a blurry iPhone camera and how to fix the problem so you can go back taking amazing photos with your iPhone.
Why Is My iPhone Camera Blurry?
Below we’ve listed the four most common causes of fuzzy photos and videos
But before we get to that, you should keep in mind that your phone’s camera specifications determine the quality of photos and videos.
So don’t expect sharp photos and videos if you’re using an older phone.
- Camera issues, such as blurry images, can be attributed to software or hardware issues.
- Accessories such as screen and camera lens protectors that are not manufactured by original equipment manufacturers (OEMs) may contribute to the problem.
- Dust and dirt on the camera lens.
- Physical damage. For instance, perhaps you’ve dropped your iPhone or accidentally gotten it wet
Check this out: Face ID Not Working Move iPhone Lower (5 FIXES)
How to Fix Blurry Camera iPhone?
Here are the five solutions to the problem:
1. Remove Non-apple Screen and Camera Lens Protectors
Before diving into solutions, try to recall whether you could capture sharp images before installing screen and camera lens protectors.
If this is the case, the issue is almost certainly caused by the screen and camera lens protectors. So remove it and test your iPhone’s camera.
If you’re wondering why this happens, it’s because some of these accessories aren’t fully compatible with smartphones.
As a result, the camera lens may become blocked, causing the images and videos taken by the camera to appear fuzzy or less accurate and clear than they should be.
Suppose removing third-party accessories or cleaning the camera lens didn’t fix the problem, and you can’t remember anything damaging happening to your phone earlier.
In that case, you can follow the steps below to fix software-related issues that may have blurred your iPhone camera’s photos.
2. Close and Reopen the Camera App

If the images and videos you’re taking with your iPhone are blurry, it’s likely that the problem isn’t serious and was caused by a glitch in the camera app.
On the other hand, if everything worked fine on your phone or the quality of the photos and videos you took has never been a problem, it may be a minor bug that can be fixed by opening and closing the app again.
If you are using iPhone 8, 8 Plus, or 9 or 9 Plus models, the force closing of the app is done with the following steps:
- Press and hold the Home button to see the running apps.
- Swipe left or right in app preview to find the camera app.
- Then drag the camera app preview up to close the app.
If you’re using an iPhone X or newer model, follow these steps to view open apps:
- Go to the home screen.
- Then swipe up from the bottom of the screen and then pause in the middle.
- Drag the camera preview app up to close it.
Relaunch the camera app a few moments later, then take a sample photo or video to see if the issue is resolved. If not, move on to the next solution.
3. Restart Your iPhone
Restarting the phone is the most basic yet effective solution for most technical problems. In addition, doing so will help eliminate minor software errors that have caused these types of camera issues.
- Press and hold the power button and one of the volume buttons until the power off slider appears.
- Drag the slider to the right to turn off your iPhone completely.
- Then after 30 seconds, press the power button again to turn on your iPhone.
For step-by-step instructions for all iPhone models, please check out our guide on how to restart iPhone.
Allow the phone to finish restarting, then open the camera app again to shoot some test photos and see if the results are expected.
4. Install Pending iOS Updates
If system bugs cause the blurry camera, installing a pending iOS update can also be the key to fixing the blurry images and videos on iPhones. Bug fixes for pre-installed apps like cameras are also included in these updates.
If you have access to a reliable internet connection and sufficient storage and battery life, download available iOS updates by following the procedures below:
1. Tap on Settings.

2. Then select General.

3. Now go to Software Update.
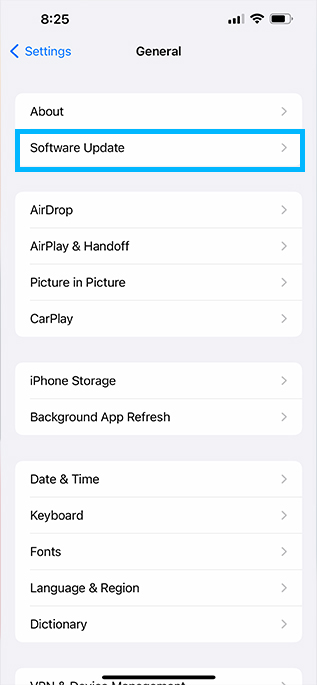
4. If you get a message that says there’s a new update, then tap Download and Install.
If your phone didn’t reboot on its own, reboot it after the update to ensure everything is working correctly. After rebooting, launch the camera app and see if the problem is still there.
5. Reset All Settings
Some custom settings on your device may not be appropriately adjusted, causing the camera app to malfunction. Follow these steps to reset all your iPhone settings:
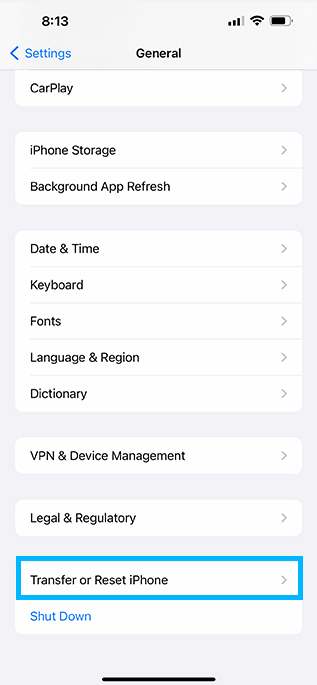
1. From the Home screen, tap Settings.
2. Select General.
3. Scroll down and tap Transfer or Reset iPhone.
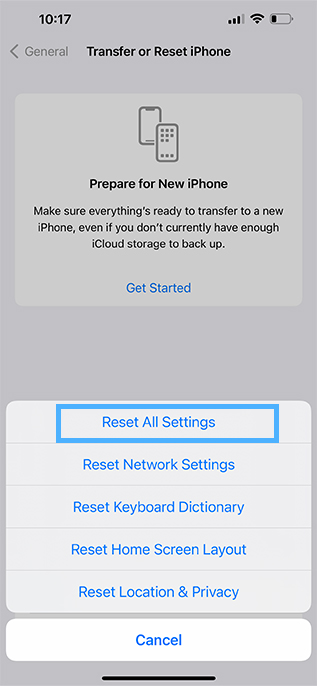
4. Touch Reset option.

5. After that, select the Reset All Settings option.
6. Enter your passcode when prompted to continue.
7. Confirm that you want to reset all your iPhone settings.
Doing this reset will clear all your custom settings along with your iPhone’s recent configuration. After resetting, all options and default values are restored. To be cautious, you may need to create a backup before proceeding with these steps.
Conclusion
If your iPhone camera is still not working after doing all of the above solutions, it is possible that your camera components are damaged and therefore require hardware repair.
At this point, the best option is to make a Genius Bar reservation to have your iPhone checked by the Geniuses at the Apple Store.