
So you forgot your iPhone passcode, now what do you do?
Everyone likes their privacy. From our personal space to gadgets and mobile devices, we want our stuff to be secure at all times. Thus, we have embraced the concept of adding passcodes to our mobile devices.
iPhones, like most mobile devices, allow users to secure their phones by introducing a passcode. The passcode ensures that no other user except the owner can get access to the device at any time. This measure is very useful, no doubt. But what happens when you forget your iPhone passcode?
Forgetting your iPhone passcode can be frustrating. If you enter the wrong passcode more than six times, you’ll see a message that your device is disabled. Your iPhone becomes useless, at least, until you can remember your passcode or find a way to get in.
Interestingly, not remembering your iPhone passcode is not the end of the world. Fortunately, experts have come up with simple and effective ways of getting around such situations. This article will guide you on what to do when next you forget your iPhone passcode.
So, read on!
Tips when you forgot iPhone passcode
Here’re all the tips you’ll learn about in this guide:
- Causes of a locked or disabled iPhone
- Restore locked iPhone using iCloud
- Erase locked iPhone using iTunes
- Reset locked iPhone using Recovery Mode
What leads to an iPhone getting locked or disabled?
Apple, the makers of iPhones, understands the need to keep prying eyes out of personal data. The company has introduced an option to allow users to “lock” their mobile phones from strangers. But it is not as simple as that.
The system automatically locks the device if the wrong passcode is entered six times. This is logical. After all, you wouldn’t have to input a wrong passcode six times if you are really the owner of the iPhone. But this is possible when you forget your passcode.
When this happens, your iPhone tells you, “It has been disabled.” In some cases, continuously entering the incorrect passcode may force the iPhone to erase all of its data. That is even worse. So, how do you avoid these altogether?
Let us take a look at the various methods of resolving this problem of forgetting your iPhone passcode.
Fixing a case of forgotten iPhone Passcode
There are three methods you can use to fix this. Basically, each option erases all the data on your iPhone. This includes the songs, pictures, videos, and the passcode itself. This is called “restoring your device.”
When you restore your device, it leaves your iPhone literally new. You will have to start the setup again. This time around, you can set a new passcode you will easily remember.
Method 1 – Erase locked iPhone using iCloud
You can only use this method if the “Find My iPhone” option is enabled on your locked iPhone. If yes, you can erase your device online using any suitable web browser. In the end, all your data will be wiped. Fortunately, you can restore your data on the phone if you have them backed up on iCloud.
Follow these steps to restore your locked iPhone via iCloud:
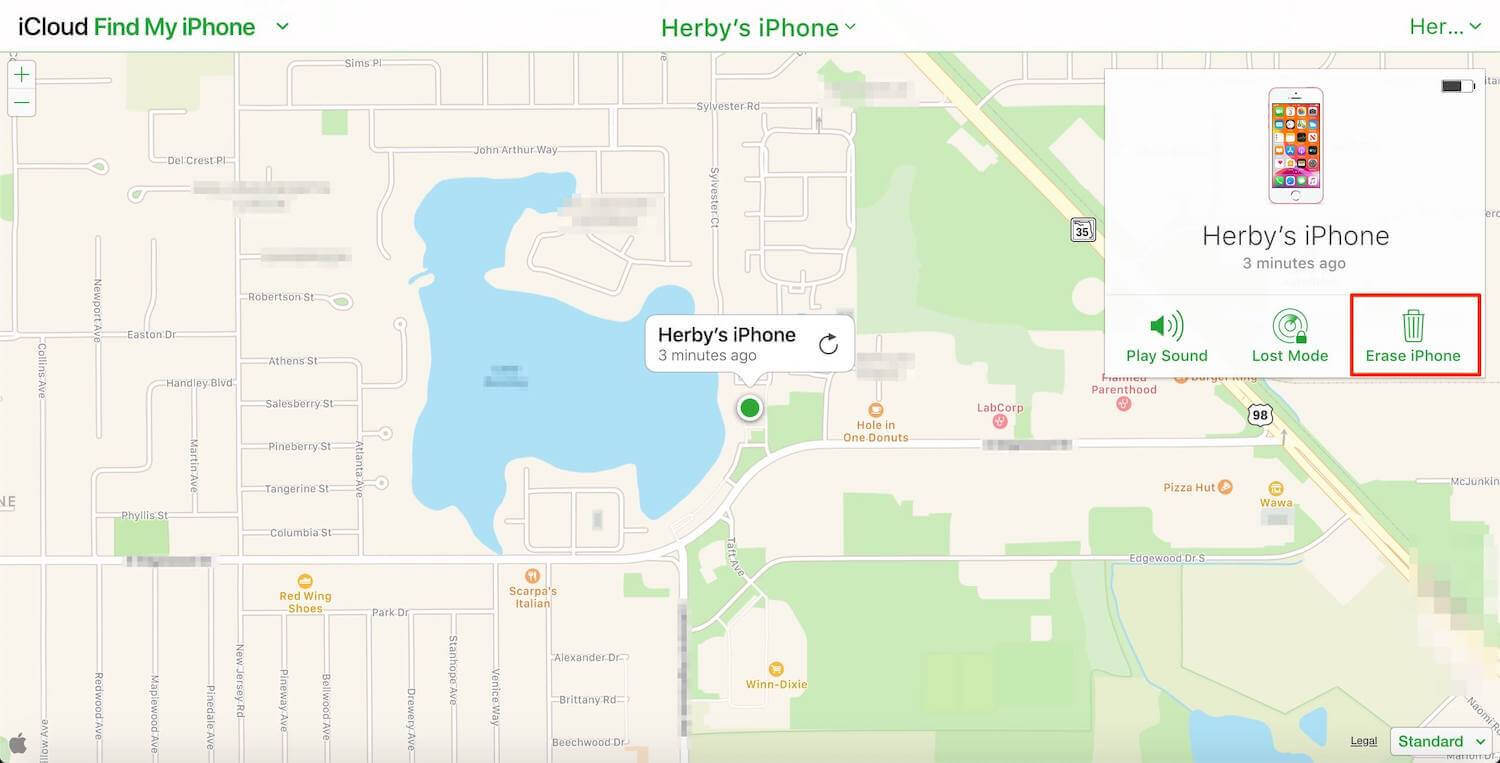
Visit www.iCloud.com in any web browser, then sign in with your Apple ID. Select “Find iPhone” from the list of tools available in iCloud.
Check the map for your iPhone or click on “All Devices” at the top, then select your iPhone. Now, click “Erase iPhone”. A pop-up window will appear on the screen asking you to confirm your decision.
Click the “Erase” button to delete all data on the phone. When prompted, enter the password to continue. This will automatically do a complete factory reset on your locked iPhone.
You’ll proceed to set up your iPhone as if it was a new phone. Then, you’ll restore your data and settings from your iCloud backup.
Method 2 – Restore locked iPhone using Finder or iTunes
Perhaps, you forgot to activate the “Find My iPhone” option on your locked device? Here is another option. This will also work if, for any reason, you could not erase your iPhone via iCloud.
This method restores your iPhone and resets its passcode by using your iTunes account. For this to work, you must have synced your iPhone to a computer before and have a recent backup. Also, that same computer must be available. Lastly, your “Find My iPhone” option must be turned off.
Once you have met these two requirements, follow the steps below to restore your locked iPhone through iTunes.

Connect your locked iPhone to the PC or Mac (the computer) you have synced your phone on previously. Use your lightning to USB cable for the connection.
After a successful connection, your device will automatically sync to iTunes. If it does not, or the device does not respond, sync the connected iPhone to iTunes manually to the PC.
Wait for a few minutes for the backup and sync to finish up. Once completed, find the “Restore iPhone” option and click on it.
The iOS Setup Assistant will notify you of a successful restoration. It will also ask if you want to set up your phone. Simply decline and click on “Restore from iTunes backup.”
What this does is wipe your phone clean. But instead of setting it up from scratch, iTunes will load your backup files. After this, you can now set a new passcode you will easily remember.
Method 3 – Reset locked iPhone using Recovery Mode
We should call this the last resort. This method is only used I you have never synced your locked iPhone with iCloud or Finder and iTunes. The implication of this is that you will have no backup whatsoever to fall on after losing everything you have on your phone.

Do you see why it is the last resort? Now, follow these steps to restore your iPhone via recovery mode:
Ensure that no cable is plugged into your iPhone, then turn it off to put it into recovery mode. Here is a great Gotechtor article with more insight on how to put an iPhone in recovery mode.
To do this, press and hold the Home button down as you connect your iPhone to iTunes. Your phone should come on automatically. If it does not, turn it on manually.
Continue holding the Home button until the “Connect to iTunes” screen pops up. iTunes will notify you that it has detected a device in recovery mode.
Click “OK” and wait for the iTunes Summary Tab to pop up. Find the “Restore iPhone” option and click it. Your iPhone will be reset to factory defaults and you have a new device with no data whatsoever.
If yours is an iPhone X or newer, the process to put it into recovery mode is slightly different. These iPhone models do not have a Home Button. So, here is what you should do instead.
- Press the “Volume Up” button, and then the “Volume Down” button at the same time.
- Hold the two buttons until the recovery mode screen pops up – within 30 seconds at most.
For iPhone 7 or iPhone 7 Plus, do this:
- Press and hold the “Volume Down” and the “Side” buttons until the recovery mode screen pops up.
Final thoughts on forgetting iPhone passcode
Whichever method you have decided to use to restore your iPhone, you will most likely be presented with an Activation Lock Screen. This is where you will type in your Apple ID and password to gain access to your device.
Do you have questions or wish to share your locked iPhone experience and how you resolved it? Please share them with us in the comments below.
Since you’ve made it this far, please don’t forget to share this guide on your favorite social media.