
If you try to update your iPhone’s firmware without a reliable internet connection, you’re likely to get an iPhone stuck on verifying update.
However, there are times when slow internet isn’t the source of the problem, and it’s rather due to a glitch in your phone’s operating system.
In this article, we’ll look at why your iPhone is stuck verifying updates and how to fix it. So without further ado, let’s get started.
Things to Do Before Troubleshooting iPhone Stuck on Verifying Update
Before you start troubleshooting your iPhone, there are a couple of things that you need to check first.
- Make sure you have fully charged your phone. Your iPhone should have enough charge to complete the verification process without interruption during updates.
- Check your Wi-Fi network connection to ensure it has a good signal strength.
What Do I Do If My iPhone Is Stuck on Verifying Update?
Here are all the troubleshooting tips that will help you fix your iPhone stuck on verifying update.
Check this out: How to fix iOS stuck on update requested
1. Lock and Wake Up Your iPhone
When your iPhone is stuck on verifying updates, the easiest and fastest way is to force iPhone’s screen to lock and wake up several times.
- Press the Power button 5 to 10 times.
- Then, wait until you see the screen goes black.
- If the problem is solved, you will see the Apple logo and the progress bar.
2. Force Restart Your iPhone
Sometimes, random firmware crashes are the main reason an iPhone stops working or gets stuck on verifying updates.
You can fix minor firmware crashes when you force your iPhone to restart. As the name implies, a forced restart will force your device to shut down and allow it to reboot.
This solution will not affect saved information and apps on iPhone, and it is totally safe.
For iPhone X and later:
- Press and release the Volume Up button quickly.
- Next, quickly press and release the Volume Down button.
- Finally, press and hold the Side/Power button until the Apple logo appears.
On iPhone 7, 7 Plus, 8, and 8 Plus:
- Press and hold the Power button and Volume Down button simultaneously for a few seconds.
- Then, release the buttons when you see the Apple logo.
For iPhone 6 and older:
- Press and hold the Power button and Home button simultaneously.
- Release buttons when the Apple logo appears.
Now, let your iPhone boot up and reconnect to the Wi-Fi network. Then follow the steps below:
1. Go to Settings.

2. After that, open General.

3. Hit on Software Update.
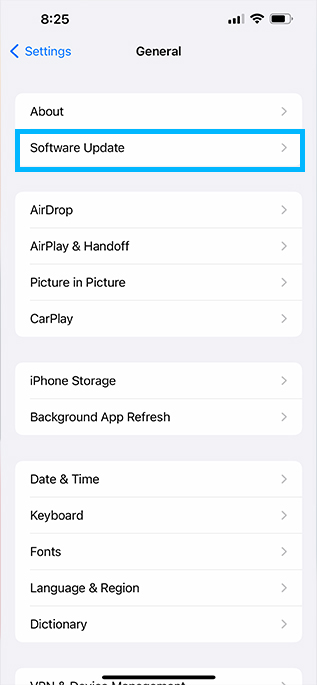
4. Next, see if you can upgrade the firmware.
3. Update Your Phone When It Is Connected to Wi-Fi Network
A stable Wi-Fi network connection is required to verify updates on your iPhone; otherwise, the update message will continue to appear as long as your Wi-Fi network isn’t strong enough.
It is worth mentioning that major updates like iOS 15 can’t be done via cellular data, and you need a Wi-Fi connection.
To check if your Wi-Fi connection is stable and reliable, follow the steps below:
1. Open Settings.
2. Then, go to Wi-Fi.

3. Check the signal strength of the Wi-Fi network you want to connect to.

4. Redownload iOS Update
If your iPhone is stuck on the update verification screen, it’s possible that the update is faulty and difficult to validate.
In this case, we recommend that you remove the update and then re-download and install it. Follow these simple steps:
1. First, go to Settings.
2. Then, touch the General option.
3. Go to iPhone Storage.

4. Following that, scroll down to the iOS option and tap on it.
5. Find the update and tap on Delete Update.

6. Then, Restart the device.
7. Now, go back to Settings.
8. Next, tap on General.
9. Go to Software Update.
10. Finally, try to download the iOS again.
Note that, if you don’t see the Delete Update button, the iOS may be downloaded correctly, and you should try other solutions.
5. Update iPhone Using iTunes or Finder
One other way to fix this issue is to update the iOS using iTunes or Finder. If you are unable to update your iPhone over the air (wirelessly), use iTunes or Finder. The process is simple, follow the steps below:
1. First, connect the device to your computer via iPhone’s lightning cable.
2. Open iTunes (make sure you are using the latest version of iTunes).
3. Let the iTunes synchronization process be completed.
4. Next, click on the iPhone icon to select your device.
5. Now, go to the iTunes Summary section and click on Check for Updates.

- Follow on-screen instructions to update the device. Don’t unplug your iPhone until the process is complete.
6. Restore Your iPhone Using Finder or iTunes
Updating your device using iTunes or Finder should fix the problem. But if your iPhone is still stuck on verifying updates or some other issues come up, you may have to restore your device using iTunes.
1. Connect your iPhone to your computer with iPhone’s lightning cable.
2. Let the synchronization process be completed.
3. Click on the iPhone icon and go to the Summary section.
4. Click on Restore iPhone.

5. Don’t unplug your device and let the process be completed.
Restoring iPhone with iTunes removes all the data and settings on the device and reinstalls everything.
But make sure to back up your data and important information because you will lose all the data on your iPhone by restoring your device.
7. Put iPhone in DFU Mode
If all the above solutions don’t solve iPhone stuck on verifying update problem, DFU mode would be the final solution.
This method will solve serious software issues. A DFU mode allows you to take control of the iOS yourself and fix the device with no issues. This process won’t affect the software itself.
For step-by-step instructions here’s how to put your iPhone in DFU mode.
8. Turn Airplane Mode On and Off
As we said earlier, network connectivity issues should be considered when your iPhone is stuck on verifying updates.
If your iPhone has sporadic internet issues, such as slow browsing or inconsistent or unreliable Internet access, the wireless update is more likely to fail.
The old Airplane mode method may help resolve the issue. Follow the steps below:
1. First, head to the Settings menu.
2. Tap on Airplane Mode.
3. Turn on Airplane Mode and reboot your iPhone.
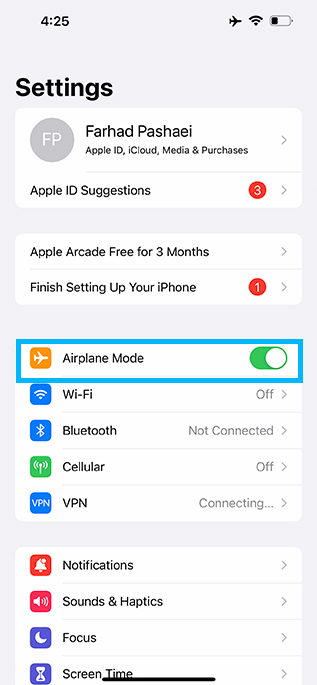
4. Go back to Settings and turn Airplane Mode off.

9. Turn off Restrictions
Enabling Restrictions on iPhones may affect downloads. If your iPhone gets stuck on verifying update, turn off restrictions.
Depending on the iOS version, the Restrictions menu is accessible through different menus. As most users have iOS 12 or later, follow the steps below:
1. First, go to Settings.
2. Then, tap on Screen Time.

3. Choose Content & Privacy Restrictions.

4. After that, tap on the switch to turn the feature off.

5. Restart your iPhone and attempt updating the device.
10. Reset Network Settings
Bad network settings may cause iPhone gets stuck on verifying update. To fix this issue you can perform a Network Settings reset.
Problematic network settings will be removed, and the default network options and values will be restored. So, simply follow the steps below to reset your iPhone’s network settings:
1. Go to Settings.
2. After that, choose General.
3. Scroll down the page and tap on Transfer or Reset iPhone.
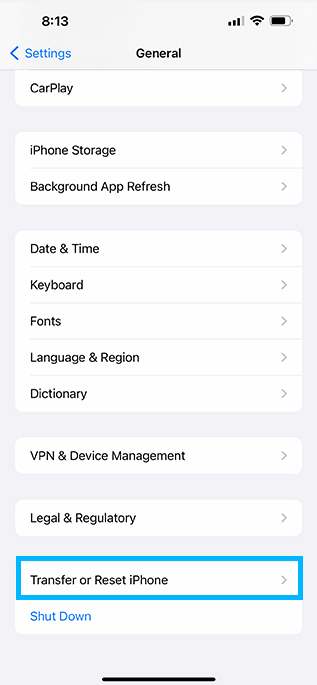
4. Next, tap on Reset.

5. Choose Reset Network Settings.

6. Finally, type your passcode and let the process be completed.
Conclusion
If you tried all the above solutions and your iPhone still gets stuck on verifying updates, you may need to make a Genius Bar reservation contact Apple Support, and they will assist you in solving the problem.
Note that, server error, technical issues, and/or hardware problems of your device can cause this error too.
There’s not much you can do in this case, and all you have to do is wait! You can also use third-party applications like FixGo to repair your iOS and make it run.