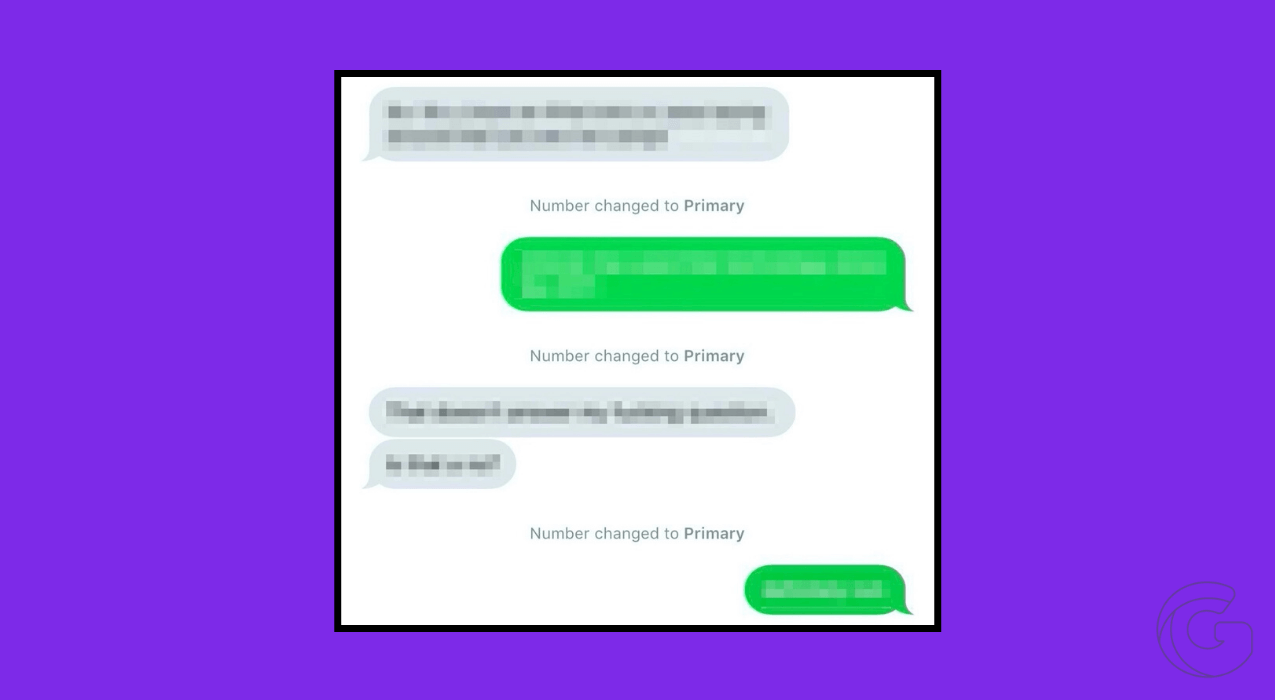
It’s super annoying to get a “Number changed to Primary” message after each text when you send or receive text messages from non-iPhone users.
You’re probably wondering:
Why does my iPhone say “Number changed to Primary”?
Is something wrong with iMessage?
What does “Number changed to Primary” mean on my iPhone?
Newer iPhone models like the iPhone XS, XS Max, and XR support dual SIM feature (nano SIM and eSIM). This useful feature lets you use two numbers at once. The dual-SIM capabilities is what causes this problem. It labels one SIM as primary, and the other as secondary.
And yet without dual SIM support, you may still see this error message appear in between your texts.
In this step-by-step guide, you’ll know why this is happening and how to fix this problem.
Tips to get rid of “Number changed to Primary”
1. Update to the latest iOS version
The first thing you’ll want to do is update your iPhone to the latest version of iOS. Keeping your iPhone up to date is a quick and efficient way to remove bugs. Each new iOS release provides patches that fix those issues.
You can either update your iPhone wirelessly or via a computer. But before you just do that, make sure to back up your iPhone using iCloud or your computer.
1.1. Update iPhone wirelessly
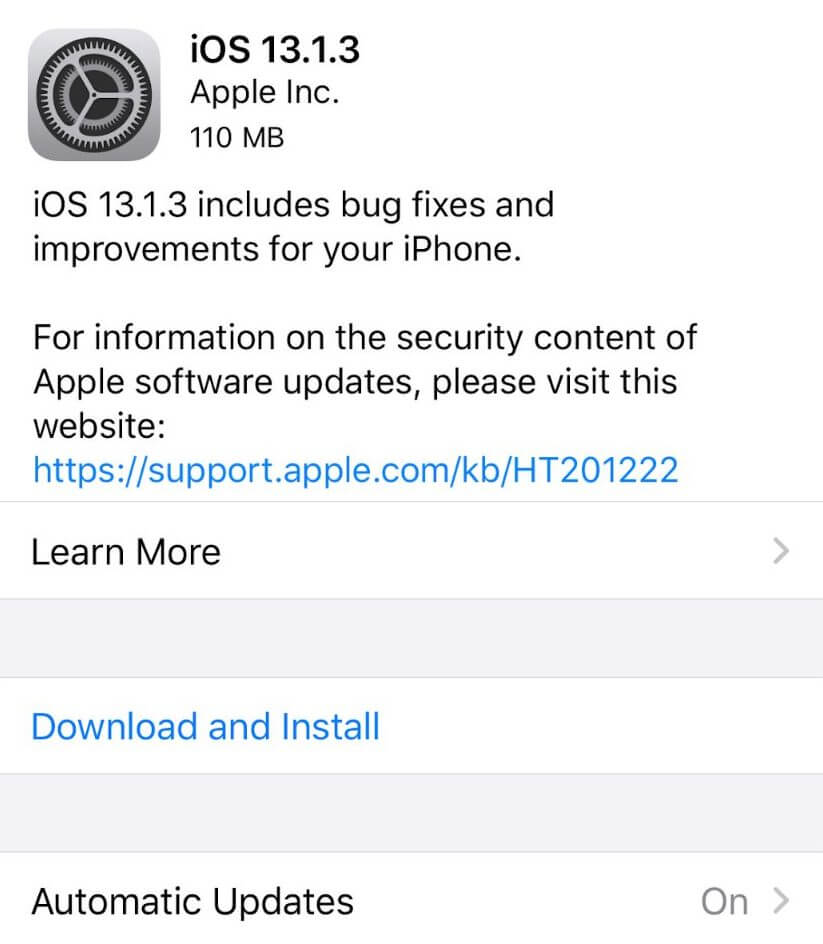
To update your iPhone wirelessly, connect your device to the internet with Wi-Fi and plug it into power. Next, go to “Settings”, “General”, then tap “Software Update”. iOS will check if there’s any software update for your iPhone.
If there’s one, it will show up there. Tap Download and Install. You may need to enter your passcode to authenticate yourself to your iPhone.
1.2. Update iPhone using your computer
Connect your iPhone to a computer that you trust. Don’t use Personal Hotspot on the iPhone you’re updating to connect your computer to the internet. Use a different Wi-Fi or Ethernet network for that purpose.

Open Finder for Mac with macOS Catalina 10.15. If your Mac is running macOS Mojave 10.14 or earlier, or you’re using a PC, open iTunes.
On the left-hand side of the Finder windows, find your iPhone under Locations. On iTunes, you can locate your iPhone by clicking on the device icon in the upper-left corner.
Next click on “Check for Update” and follow the on-screen instructions to update your iPhone.
2. Eject your SIM tray
The same way turning off and on an electronic device may fix many problems, ejecting your SIM tray may fix this bug too.
Get yourself a SIM eject tool and insert it into the SIM tray eject hole. If you don’t have one, a toothpick, paper clip, or a staple could do the trick.
Once the sim tray pops out, pull it straight out and push it back in.
3. Reset iMessage & FaceTime
This may and may not work since this problem happens only when sending text messages to non-iPhone users. But it costs nothing to try it out.


Open your iPhone Settings, scroll down and tap “Messages”. Then, slide the toggle next to iMessage to the off position (when it’s gray).
Repeat the above steps except for FaceTime and wait at least for a minute before turning them back on
Now go back to your conversation thread and send a message to that person to see what happens. You may need to delete the whole conversation that says “Number changed to Primary” before sending a new message. If you have important messages that you don’t want to lose, take a screenshot to save them.
In case you’re interested, you should check our guide on how to know if someone blocked you on iMessage. It has plenty of tips and tricks to help you figure out if they block your number on iMessage.
4. Enable only your phone number
Go to your iPhone Settings, tap “Messages”, then “Send & Receive”. A new window will open with your phone number and email accounts where you can send and receive iMessages or start a new conversation. Under both tabs, only enable your phone number and uncheck everything else.
You may find many online suggestions about removing the country code (+1 for USA, for example) as a possible solution. But when you follow these steps (Settings > Phone > My Number), it won’t let you remove the area code.
5. Hard reset your iPhone
If nothing else has worked, you may need to perform a hard reset (force restart) on your iPhone and restore it as new to get rid of “Number changed to Primary” label in the Messages app. This will wipe out everything on your phone. It’s always wise to have a recent backup before proceeding.
To reset your iPhone, open Settings, tap “General,” then scroll down and tap “Reset.” On the next screen, tap “Erase All Content and Settings”.
If you have iCloud enabled, you may get one of these pop-up messages. One that says “Finish Uploading Then Erase” or the other asking to update your iCloud Backup before erasing.
Enter your Passcode then, tap “Erase iPhone” to reset it. Once your device reboots, we recommend you set up your device as new after the reset.
If this article was helpful, please share it with your friends so they can enjoy it too.