
Is your iPhone flashlight not working, and it is greyed out in Control Center? Although it may appear strange, even though flashlights are not bleeding-edge technology, they can still malfunction.
The flashlight is an important part of your iPhone as we use it to take photos in low-light places or light the route at night. So it can be frustrating when your iPhone flashlight stops working.
But don’t worry, and we can help. Follow the tips in this guide to get your iPhone flashlight working again.
How to Fix the iPhone Flashlight If It Not Working
If your iPhone flashlight is not working, you need to restart your iPhone. Rebooting your iPhone should fix any app or process conflicting with the flashlight.
If that doesn’t fix the problem, follow these tips in the order listed until you find the one that fixes your iPhone flashlight.
- Check Your iPhone Case
- Charge Your iPhone
- Check Your iPhone Temperature
- Close Camera App or Any App with Access to the Camera
- Check Flashlight in the Camera App
- Restart Your iPhone
- Reset iPhone Settings
- Restore Your iPhone to a Previous Backup
- Change Control Center Settings
- Factory Reset Your iPhone
- Update iOS
- Contact Apple Support
1. Check Your iPhone Case
This may sound ridiculous, but this might be why your iPhone flashlight is not working. Have you lately bought a new case for your iPhone?
Maybe it’s blocking your iPhone’s camera lenses or flash, and removing it may solve the problem. Sometimes magnetic or metallic cases may interfere with the camera function and cause the problem.
2. Charge Your iPhone
Another simple explanation for your iPhone flashlight not working is the battery level. When your iPhone is in Low Power Mode, its power is limited, and you won’t be able to utilize certain features.
Please see our guide on how to save battery life on your iPhone for battery-saving tips and tricks.
Check to see whether the problem has been resolved after charging your phone. If not, move on to the next troubleshooting tip.
3. Check Your iPhone’s Temperature
As you probably know, you shouldn’t leave your phone in a hot or cold environment where the temperature is below -4 or above 113 degrees Fahrenheit. Several problems happen when your iPhone becomes too hot or cold.
For example, your display will dim or even go black until your phone cools down, and your camera flash will be disabled until your phone cools down, among other things.
So, if your iPhone is too hot or too cold, wait until it reaches room temperature before using it. Never put it in the refrigerator or freezer to speed up the process.
4. Close the Camera App or Any App that Has Access to the Camera
When you try to use the flashlight while using the Camera app, it may cause an issue. This is because both require the camera’s flashlight, which cannot be used simultaneously.
If you have an iPhone X or newer model, swipe up the Home screen, open the Camera app, and swipe up on it to close it.
For those with an iPhone 8, iPhone 8 Plus, or an older device, press the Home button twice, then slide up to close the Camera app.
Furthermore, in some cases, when you access the Control Center and try to activate your iPhone flashlight, the icon is greyed out.
This issue happens when you try to turn on the flashlight while using an app with access to your camera.
Sometimes when you’re surfing Instagram, you notice that it’s greyed out since iOS doesn’t let you turn it on while an app has access to your camera.
You can close the Instagram app or any other camera app you’re currently using to use your flashlight.
5. Check Flashlight in the Camera App
Several people in an Apple discussion thread have reported that turning the flash on and off while in Video mode in the Camera app works to fix the flashlight on iPhone not working.
Alternatively, some users have reported success by turning on the flash in the Camera app and then exiting the app.
To do this:
1. Open the Camera app.
2. Select Video at the bottom of the screen.
3. Tap the Flash icon at the top to turn it On or Off.

4. Now, record a video to see if the flashlight is working.
Return to Control Center and see if you can turn on the flashlight there. If the problem has not been resolved, proceed to the next step.
6. Restart Your iPhone
If the previous solutions don’t work to fix your iPhone’s flashlight, the next step is to restart your iPhone.
1. Press and hold down the Sleep/Wake and Volume Down buttons until the options appear.
2. Then, swipe right on the Slide to power off option.
3. After a few seconds, press the side button to turn it back on.
Now check to see whether the issue has been resolved. If not, proceed to the next solution.
7. Reset iPhone Settings
The next step you can take is to reset the iPhone settings. If you want to save your settings, back up your iPhone before returning them to their defaults.
To reset your iPhone’s settings, follow the steps below:
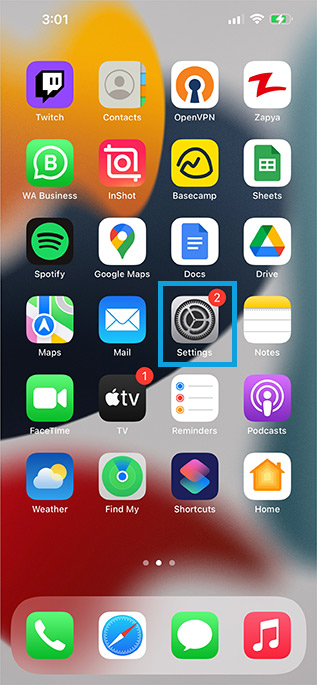
1. Go to Settings.

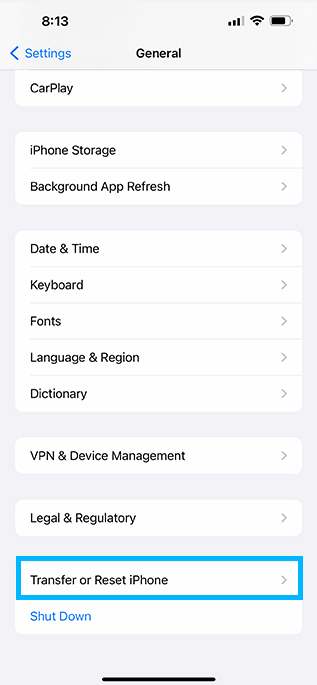
2. Tap on General.

3. Choose Transfer or Reset iPhone.
4. Choose Reset.

5. Choose Reset All Settings.
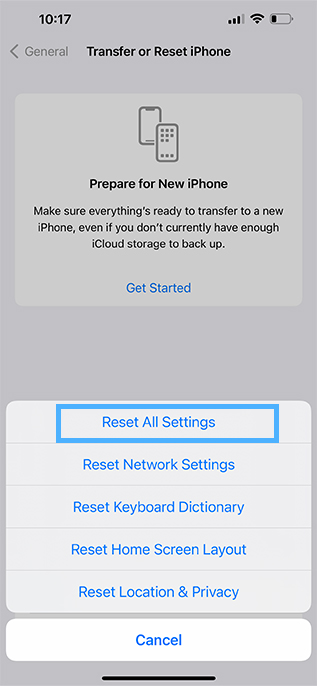
6. Enter your Passcode and let the iPhone settings reset.
8. Restore Your iPhone From a Previous Backup
In case you didn’t have this issue before, you can restore your iPhone from a backup through Finder or iTunes.
To restore your iPhone, follow the steps below:
1. Open iTunes on your Mac or Windows computer.
2. Connect your iPhone to your computer.
3. Click on the iPhone icon, then choose Back Up Now.
5. Then, Select Restore Backup. The steps may differ depending on whether you’re using a Mac or a Windows PC.

6. Backups available on your computer will be shown with dates. Choose the one best fits you and select Restore.
9. Change Control Center Settings
A few people on Apple forums claim that removing the flashlight from the Control Center and then adding it again fixed their iPhone flashlight problem.
Here’s how to do it:
1. Open the Settings app.
2. Go to Control Center.

3. Tap the minus sign (-) in the red circle next to the flashlight.

4. Tap Remove to remove the flashlight from the Control Center.
5. Following that, restart your iPhone.
6. Go back to Control Center Settings.
7. Scroll down and tap + near the flashlight to add it again.
10. Perform Factory Reset
The last option for resolving an issue is to reset the factory, but keep in mind that this will erase all of your data and restore factory default settings. So make sure to back up your iPhone before moving forward with this step.
To factory reset your iPhone, follow these steps:
1. Open the Settings app.
2. Select General.
3. Then, tap on Transfer or Reset iPhone.
4. Choose Erase All Content and Settings.

5. After that, press Continue.
11. Update iOS
Updating iOS has become a cliché in troubleshooting articles, but that’s because it works!
If your iPhone’s OS is not updated to the latest version, take some time and update it.
1. Select Settings.
2. Tap on General.
3. After that, choose Software Update.
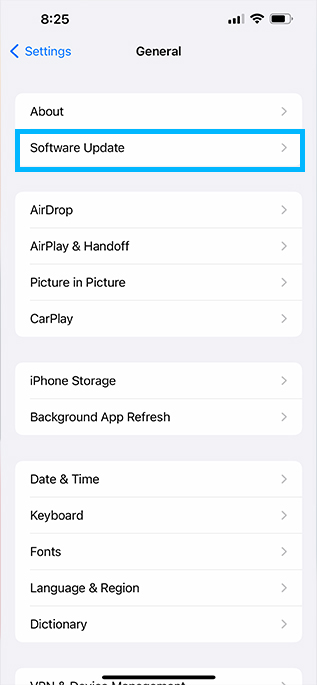
4. Then, update iOS.
12. Contact Apple Support
If your iPhone flashlight is not working, but the Flashlight icon or button isn’t greyed out, there may be something wrong with the hardware in your iPhone, and you should contact Apple support for assistance.
If you bought your device within the last three months (90 days), you’re eligible for free support.
In addition, your device can be fixed for the cost of a service fee or deductible if you have Apple Care+ or another insurance plan.
Final Thoughts on Flashlight Not Working on iPhone
And there you have it. Our step-by-step guide for fixing an iPhone flashlight that’s not working. We hope these troubleshooting tips came in handy in helping you get your iPhone flashlight working again.
However, if none of the troubleshooting techniques have worked for you, you should contact Apple support, as we’ve suggested above. It could be a hardware issue, which means you’ll need the assistance of a professional.
If your iPhone is still under warranty, a professional at the Apple Store or a registered repair shop can restore it for a modest price or even for free.
If you have any feedback or questions, then please don’t hesitate to leave a comment below.