
Do you have problems making calls or sending text messages because your IMS Registration status is “Not Registered”?
You’re not alone. This common issue affects many Android users across various carrier networks, which can be frustrating.
In this article, you will learn what the IMS Registration status is and how to check your IMS registration status. We will also walk you through how to fix the IMS registration problem.
First, let’s discuss what the IMS registration status is.
What Is the IMS Registration Status?
IMS stands for IP Multimedia Subsystem. IP means Internet Protocol. The IMS service comes pre-installed on your Android device and helps it connect to and communicate with your service provider.

It allows phone calls, text messages, and multimedia messages to be carried through the correct IP network system. It automatically connects its service to your service provider.
The IMS registration status indicates whether your Voice Over LTE (VoLTE) service is active. When the status is “not registered,” you won’t be able to make or receive calls or even send text messages.
How to Check Your IMS Registration Status
Checking your IMS registration status is really easy. Follow these steps to do so:
- Open the Settings app.
- Go to About Phone.
- Click on the All Specs tab.
- Tap multiple times on Internal Storage until it opens the Settings or Testing page.
- Choose the SIM you want to check. It will be named Phone Information 1 or 2.
- When the Phone Info page opens, click on More options. It should be a three-dot menu at the bottom of the screen.
- Select the IMS Status tab.
You can now view your IMS registration status.
Why Is Your IMS Registration Status “Not Registered”?
IMS Registration may indicate “Not Registered” for various reasons, such as a damaged or missing SIM card, corrupt radio firmware, or outdated OS. However, the primary is often a non-provisioned SIM card.
On some occasions, the following can also cause the IMS Registration status “Not Registered”:
- The carrier network is not selected in the device settings.
- Poor network or mobile network not available.
- Switching to a new SIM card.
How Do I Fix IMS Registration Not Registered?
Some of these troubleshooting steps below also apply to fix the “Not Registered on Network” Error on Android. So keep these tips in mind for future reference.
1. Toggle Airplane Mode On and Off
When facing network-related issues, it is always a good idea to toggle Airplane Mode (or Flight Mode) on and off. It helps to reset your phone’s connection.
To reset Airplane Mode, swipe down from the top of your screen to show the menu. Click on the airplane icon to turn it off/on. Turn it on, wait for about a minute, and then turn it off.

Check to see if your IMS registration status is now registered. If it isn’t, please try the fixes below.
2. Restart Your Android Device
Sometimes, this error might come from a system glitch. Restarting your phone will clear the RAM and all processes running on the phone. This gives your device a fresh start and can help clear bugs.
To restart your Android Device, please follow these steps:
- Long-press the ON/OFF button on the side of your device until you get a prompt like the one below.

Note: If you have a different Android brand, the interface you get may differ from the image above. The buttons will still be the same, though.
3. Reinsert Your SIM Card
Taking out your SIM card and placing it in the tray properly can help change your IMS registration status to “registered.”
If your SIM card isn’t sitting properly in the tray, it will not work effectively, and sometimes, it will not even show on your device.
To remove and insert your SIM card, you must remove the SIM tray with the SIM ejector tool (a pin-like object). Then, push the pin gently into the hole beside the SIM tray to release it.
Take out your SIM card and check for damage to the card. If none exist, put the SIM card and tray back in correctly.
Now, restart your phone and check the IMS registration status.
4. Update Your Operating System
Having an out-of-date Android version poses problems for your phone and its apps. Updating your OS regularly allows your Android device to work optimally and is completely free.
To update your Operating System, follow these steps:
- Go to Settings and select Software Update.

- If there is an update available, click on Download and Install.

- Click on Download to start the software update.

Wait for the OS to install. After updating and installing, IMS should now be registered.
5. Activate the Radio and Turn On IMS over SMS
To register your IMS, you will need to enter the device information mode, activate the radio, and turn on IMS over SMS.
Follow the steps below to do so:
- Open the Phone app and go to the dial pad.
- Type *#*#4636#*#*
- Go into Service Mode.
- Select Device Information.
- Click on Run Ping Test.
- When the test finishes, click on the Turn Radio Off button.
- Now, click on Turn SMS over IMS.
- Restart your device.
6. Manually Select Your Mobile Carrier
Your Android device is programmed to automatically select a network operator by default. However, changing your network operator manually can help you register your IMS.
To change your network operator, follow these steps:
- Open the Settings app.
- Click on the SIM cards and Mobile Networks tab.

- If your phone is a dual SIM device, select the SIM you use to connect to the internet.

- Click on Mobile Networks.

- Turn off the Automatically Select Network button and confirm the action in the dialogue boxes.

- Select the Network of your choice.

Your phone will now connect with the carrier. Check to see if IMS is still not registered on your phone.
7. Change Your Preferred Network Type
Sometimes, your phone’s network settings might be incompatible with the SIM you are using.
If your network type is set to 4G or 5G, you will need to change your preferred network type to 3G or 2G so that it can register your IMS.
Follow these steps to change your preferred network mode:
- Open Settings.
- Click on SIM cards and Mobile Networks.
- If your phone is a dual SIM device, select the SIM you use to connect to the internet.
- Click on Preferred Network Type.

- Change it to 3G.

Now, check your IMS registration status. If it still says “Not Registered,” change the network type to 2G.
8. Reset Your APN Settings
APN stands for Access Point Name. Simply put, it connects your device to your mobile network and the internet.
Sometimes, these APN settings might not be set up correctly. To fix this, you have to reset them to their default settings.
To reset your APN settings, follow these steps:
- Open Settings.
- Click on SIM cards and Mobile Networks.
- If your phone is a dual SIM device, select the SIM you use to connect to the internet.
- Click on Access Point Names.

- Click on the Reset button to return the APN settings to default.

- Restart your phone and check your IMS registration status.
9. Reset Network Settings
If the network connectivity is corrupt, the IMS registration status might read “not registered.” To fix this, you will have to reset your network. This is usually a last resort when dealing with network-related issues.
Resetting your network does not clear your data. It only resets your wifi, Bluetooth, and internet settings to their default mode.
Follow these steps to reset your network settings:
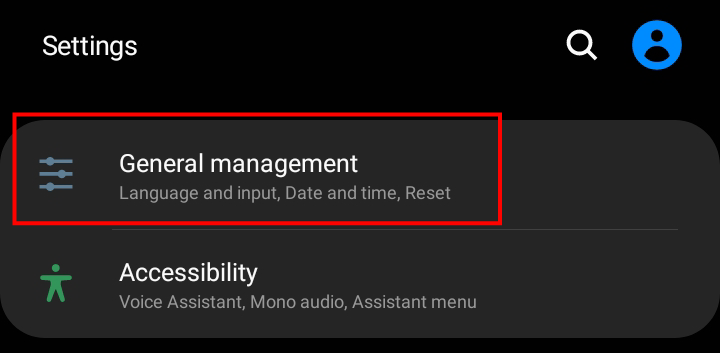
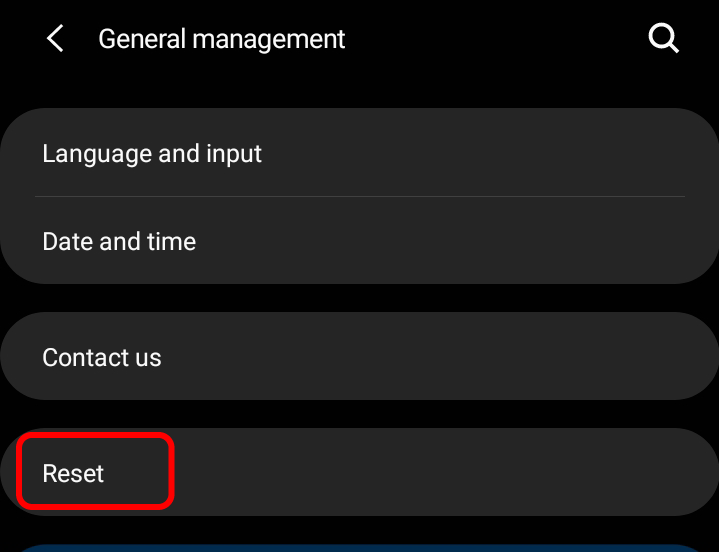
- Go to Settings and click on General Management.
- Click on the Reset panel.
- Select Reset Network Settings.

- Click the Reset Settings button to reset your device’s network settings completely.

This will register your IMS and reset all the settings. Restart your phone and check.
10. Try Another SIM Card
If all fails, you can use another SIM Card to test whether the issue is with your Android device or your SIM card.
Insert another SIM card into your tray and try to use your phone. If your IMS registration status says registered, your SIM card is the problem and must be replaced.
11. Contact Your Mobile Network Provider
If you still cannot fix the IMS registration issue, contact your mobile network provider. If the issue is from their end, they should be able to advise you on registering your IMS.
If you have any other ideas or suggestions, don’t hesitate to suggest them in the comment section below.